How to Make Freeze Dry Candy at Home?
Freeze Dry Candy has gained popularity in recent years. This method preserves flavors and textures, making treats last longer. According to a recent market report, the freeze-dried food industry is projected to reach $76.4 billion by 2025. Many enjoy the unique crunch and intense flavor of freeze-dried sweets.
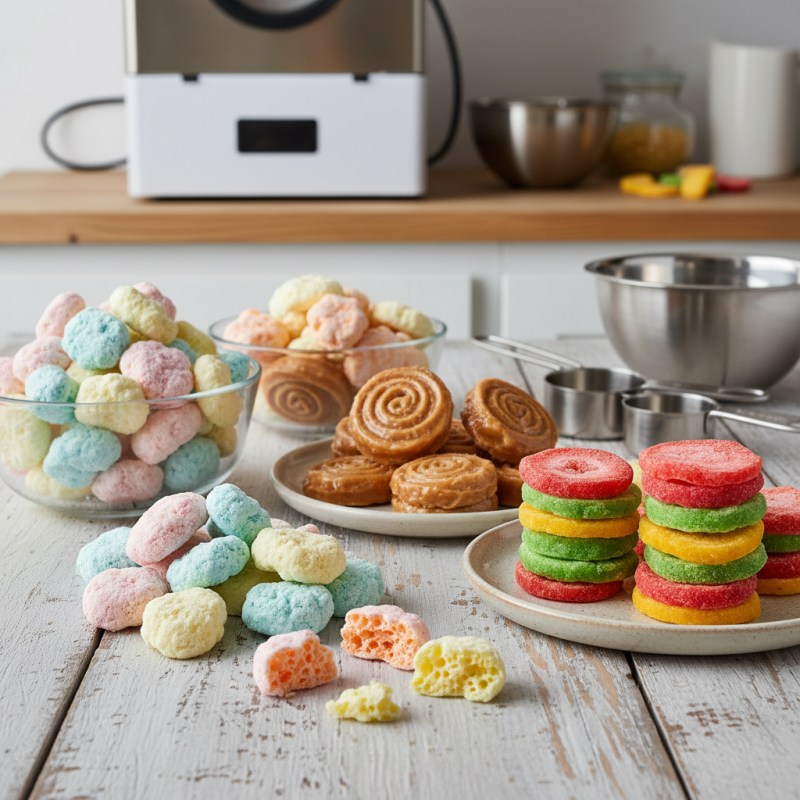
Making Freeze Dry Candy at home can be a fun and rewarding process. However, it's not without challenges. Finding the right equipment can be tricky. Home freeze dryers can be costly, and not everyone may have access. Yet, this shouldn't discourage candy enthusiasts. Experimenting with different recipes can lead to delightful results.
While the process is relatively straightforward, it's essential to pay attention to details. The right temperatures and times make all the difference. Straying from recommended guidelines often yields disappointing treats. Having patience and being open to trial and error is key. Ultimately, mastering Freeze Dry Candy can elevate your candy-making skills and delight your friends and family.
Understanding the Basics of Freeze Drying Candy
Freeze drying candy is a unique process that enhances flavors while retaining the original shapes of sweet treats. To understand freeze drying, it helps to know that it involves three main steps: freezing, vacuuming, and heating. During freezing, the moisture in the candy becomes ice. This solid-state allows for a smoother transition to the next phase. In the vacuuming phase, pressure decreases, causing the ice to evaporate directly into vapor. This is why freeze-dried candies can be so light and crunchy.
A study by the Institute of Food Technologists stated that freeze-dried products retain about 95% of their original nutritional value. This points to a common appeal: consumers prefer snacks that keep their nutrients. Yet, the method isn’t foolproof. It can alter the candy’s texture, which some may find off-putting. Experimentation is key. For example, marshmallows might turn overly crispy. This inconsistency can lead to unexpected results. It’s part of the process.
Many enthusiasts find that certain candies work better than others. Gummy sweets can yield pleasantly chewy bites, while chocolate might not perform well. Understanding these nuances is essential. Each candy behaves differently during the freeze-drying process. Therefore, patience and a willingness to learn from less-than-perfect outcomes are vital for creating successful freeze-dried treats at home.
Essential Equipment Needed for Home Freeze Drying
Freeze drying candy at home can be an exciting project. To embark on this journey, you will need some specific equipment. The most crucial item is a freeze dryer. This machine removes moisture from food while preserving its shape, flavor, and nutrients. According to industry reports, the global freeze-drying equipment market is projected to grow significantly, indicating rising interest among home enthusiasts.
In addition to a freeze dryer, you will need vacuum sealing bags. These bags keep the candy fresh after freeze drying. A scale is also useful for precise measurements of ingredients. This helps ensure the right texture and taste. Moreover, a pH meter can be an excellent tool for testing the acidity of your candy. Maintaining the correct pH can enhance flavor retention during the freeze drying process.
However, there can be challenges. Freeze drying requires patience and practice. Not every batch will turn out perfectly. Environmental factors can affect drying times. Sometimes the candy may not achieve the desired consistency. It’s essential to track results and adjust methods accordingly. Learning from past attempts can lead to better outcomes in the future. Remember, experimentation is key in making great freeze-dried candy.
Freeze Dry Candy Experiment Results
Step-by-Step Guide to Preparing Candy for Freeze Drying
To prepare candy for freeze drying, start with your favorite candies. Gummies, marshmallows, or chocolates work well. Cut larger candies into smaller pieces. This will help them freeze dry evenly. Spread the pieces on a tray. Make sure they don’t touch each other. It will improve airflow.
Tips: Use silicone mats on the trays. This will prevent sticking and make cleanup easier. Keep an eye on your candy as it freezes. Some might need more time than others. Don’t be afraid to experiment. Each type of candy behaves differently in the freeze dryer.
Once your candy is on the trays, put them in the freeze dryer. Set the machine according to the manual. The process can take 24-48 hours. Check back regularly. If you see any moisture, they need more time. When done, they should be light and crunchy. Store them in airtight containers for the best results.
Optimal Storage Methods for Freeze-Dried Candy
When preparing freeze-dried candy, storage is crucial. Keep the candy in airtight containers. This prevents moisture from ruining your hard work. Mylar bags work well, sealing in freshness. Use a vacuum sealer for the best results.
Store the candy in a cool, dry place. Avoid areas with temperature fluctuations. Direct sunlight is a no-go. I once left candy on the counter. It absorbed humidity and lost its crunch. Learning from that mistake, now I store it properly. Label containers with dates for easy tracking.
Experimenting with different containers can be helpful. Glass jars can look appealing but aren't always airtight. I tried using them, and they let in air. It’s essential to test and reflect on what works best. Keep trying different storage methods. Your results may vary and improve over time.
Exploring Flavor Variations for Freeze-Dried Treats
Freeze-drying candy at home opens up a world of flavor exploration. With a growing interest in unique snacks, many enthusiasts are trying out different tastes. According to a recent report, the freeze-dried food market is projected to grow by 7.5% annually. This shows that people are craving diverse and innovative treats.
Fruit flavors stand out in freeze-dried candy. Think strawberries, bananas, and mangoes. They capture the essence of freshness and sweetness. Experimenting with combinations can yield surprising results. Chocolate and berry mixes add a gourmet twist. Yet, too much chocolate can overpower the fruit, making balance crucial.
Tip: Start with simple blends. Test small batches before scaling up. Keep notes on what works and what doesn’t. Sometimes, unexpected flavor clashes can lead to unique creations. Adjust the sugar levels based on the type of fruit used. Too much sugar can make them overly sweet.
Aside from fruits, spices can enhance your candy experience. A pinch of cinnamon can elevate apple treats. However, getting the right balance can be tricky. Too much spice might scare off the average palate. Always taste as you go. The goal is to surprise without overwhelming.
Tip: Don’t hesitate to get creative. Play with textures, too. A crunchy outer layer on soft fruit could add an exciting element. But ensure even drying for uniform results. An uneven texture can detract from the overall enjoyment.
